


Water generators have been around for a very long time and are called Hydro generators. Countries not only build dams to control the water flow but also to generate electricity cheaply.
Dams work well due to the virtually endless supply of water which is stored in the reservoir. This water is controlled to fall down the length of the dam with the help of gravity to provide pressure to turn a hydro turbine.
There are not a lot of water hydro generators around available to the public mainly due to not everyone having access to fast flowing water. This is why many DIY projects in power generation have started to come to light.
Table of Contents
The logic behind the washing machine generator
We will be using the Fisher and Paykel Smart Drive washing machine motor to charge a battery bank which in turn will be used to power my survival cabin via a 24v to 110v inverter.
Dropping the voltage down will require a small modification the washing machine stator motor. If we don’t make this change these motors can output up to 400v which starts to get dangerous.
These motors can also be powered by a windmill if you wanted to make some vanes.
What do you need to make a Hydro Generator?
You are going to have to get a Fisher & Paykel Smart drive washing machine. These have very efficient motors in them with rare earth magnets which are perfect for high-performance power generation. I’m told Whirpool Cabrio and Maytag Bravos also use the same type of stator motor.
You can try your luck at an appliance repair business in your city or check at the local rubbish dump.
What we require is the stator, rotor, plastic tub, shaft, and bearings. Ditch the rest. As it stands the washing machine motor can already be used as a generator but it will generate a very high voltage in the range of 400 V plus.
This is too high for us so we will have to break out the soldering iron and side cutters to make some adjustments to the windings. Don’t worry this is very straightforward. Just time-consuming.
How to rewire the Fisher & Paykel stator.
This is where the fun starts, you will need to cut in the middle if every 6 poles. It looks confusing but if you check out the video from Angry Ram he explains it well.

We then have to rub off the stator windings enamel with some fine sandpaper and then solder the twisted together connections according to the modified diagram above.
I use a cordless gas soldering iron as I like the freedom of cutting cords and it heats up quick. Just be sure to have a can of refill propane gas on hand in case you run out of gas. But there is nothing wrong will a budget 110v soldering iron.
Once its all wired up including the inner rail (I used 2.5mm cable) its time to use a hot glue gun to seal all your connections in place. We don’t want any vibrations causing a short circuit.
Your new stator is now wired up and will provide a safer 24v direct to charge up a battery bank.
How to build a hydroelectric generator
This is where your DIY handyman skills come into play. To cut up the tub I used a Ryobi 18v jigsaw but a hacksaw blase will work as well. Just tape up one end of the blade to hold onto.

The Pelton Water Wheel I used was a Turbine 8.25″ (210 mm) sized wheel. Depending on the size of your shaft you may need to get a sleeve made up. A small piece of the copper sheet also works well if there is only a small gap to fill. Just wrap it around the shaft 1 turn.
These Pelton wheels can be purchased from eBay or Amazon.
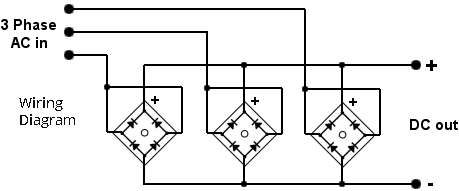
How to build a 3 phase bridge rectifier.
As these motors output 3 phase AC current we are required to convert to single phase and DC current. We can do this by building our own bridge rectifier.
Wire the positive side of the rectifier together with 2.5mm cable. This is the DC output side. Push on clamps works the best.
Connect all the negative side of the rectifier, this is the DC negative output to your voltage regulator and battery bank.
Connect each side of the 3 phase stator windings to the positive input side of the rectifier.
| DC COMPONENTS | |
| single-phase bridge rectifier | |
| 400V | |
| 35A | |
| 400A |
Once you have completed the wiring up of the 3phase bridge rectifier you will now have a low voltage DC output which can be connected to your 24v battery bank.
A neat little device to check how much power you are using from your survival shelter is called the Efergy E2 wireless power monitor. I use it in my house to monitor the total power and solar generated.
Putting it all together
Once you have all of your plumbing installed from your stream or dam its time to put it all together. Don’t forget to include inspection flaps and drain holes for the water to run out.
Your water pressure will be different but the general rule is the longer the drop from the water source the higher the pressure so use good strong conduit and remember to glue every piece or the pipework will come apart.

As an electrician and a survivalist prepper, I want to share some of my ideas, thoughts, hardware, and survival techniques I have learned over the past 20 years. The world is changing fast and we need to be repaired for what may come if society breaks down.


